Screen recording can be incredibly useful for anyone using a Chromebook, whether you’re a student, teacher, or professional. Need to capture a lecture, create a tutorial, or record a presentation? You can do that on your Chromebook thanks to its built-in screen recording tool (since Chrome OS 89) that makes recording your screen simple and quick — no extra apps or extensions needed. We’ll show you how to use this tool so you can record and share what’s happening on your Chromebook screen whenever you need to.
The simplest way to record your Chromebook’s screen is by using the Screen Capture tool. Here’s how to find and use it:
1. Open the Screen Capture Tool
- Click on the time at the bottom-right corner of your screen to open the Quick Settings Panel.
- Look for the Screen Capture tool (it looks like a small square with a circle) and click on it.
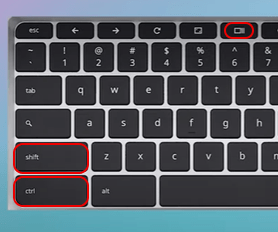
Tip: You can instantly open the Screen Capture tool using the keyboard shortcut Ctrl + Shift + Show windows.
2. Choose Recording Mode
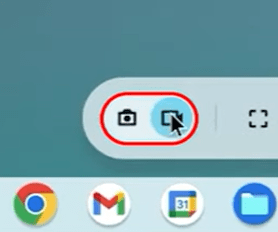
The Screen Capture tool lets you either take screenshots or record your screen. By default, the tool will be set to take a screenshot. To switch to recording mode:
- In the toolbar at the bottom of your screen, you’ll see a camera icon (for screenshots) and a video camera icon (for screen recording). Click the video camera icon to switch to screen recording mode.
If you need a quick screen grab, learn how to take a screenshot on a Chromebook.
3. Select Recording Option
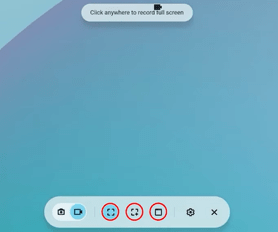
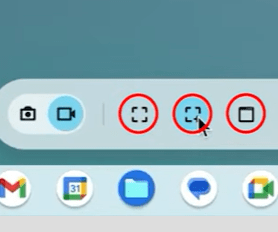
After switching to screen recording mode, you’ll need to select one of the three recording options, depending on how much of your screen you want to capture:
- Full screen to record everything that happens on your screen.
- Partial screen to record only a selected portion of your screen.
- Window to record a specific window or app.
4. Adjust Your Settings
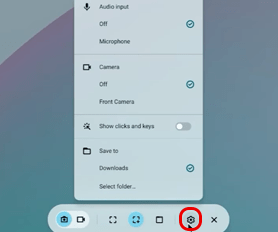
Before you start recording, explore the small gear icon in the Screen Capture toolbar for a few handy options:
- Audio: This is turned off by default. If you want to record your screen with audio, select one of the following options: device audio, microphone, or device audio and microphone.
- Camera: This is also turned off by default. If you want to record your screen with your camera on, turn on Front Camera. Your camera image will appear in a small circle, which you can pick up with your cursor and place it wherever you like on the screen.
- Keys and clicks: If you want to show key combos, mouse clicks, and touch gestures while recording, turn on Show keys and clicks.
5. Start Recording
Once you’ve selected your recording option and adjusted your settings, you can start recording. Here’s how to start recording for each option you’ve chosen:
- Full screen: Click anywhere on the screen to start recording.
- Partial screen: Click and drag to select the area you want to record. Then click Record video within the box to begin recording.
- Window: Click the window or app you want to record.
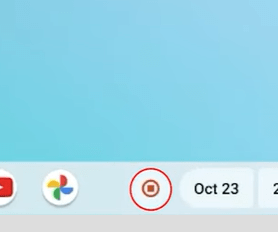
A short countdown will appear on your screen, giving you three seconds to get ready. Once the recording starts, you’ll see a small red dot on the shelf (the taskbar at the bottom), indicating that the recording is in progress.
6. Stop Recording
When you’re done and want to stop recording:
- Click the red dot on the shelf at the bottom of your screen.
- This will stop the recording, and the file will be saved automatically to your Downloads folder as a WebM file, which you can then view or share.
Tip: You can also use the keyboard shortcut Search + Shift + X to stop recording.
How to Edit Screen Recordings on a Chromebook
Google Photos now offers basic video editing tools, but unfortunately it currently doesn’t support editing WebM video files, which is the default format for screen recordings on Chromebooks. To work around this, you can first convert your WebM video to a more compatible format, like MP4, which Google Photos can edit. You can do this with an extension like Video Converter or an online converter like CloudConvert.
If you want more editing options, you can use third-party apps and extensions popular on Chromebooks like Loom (also a screen recorder) or web-based video editors like WeVideo.
Tips for a Smooth Screen Recording on a Chromebook
To make your screen recording as smooth as possible, keep these tips in mind:
- Close unnecessary tabs: Having too many open tabs can slow the recording process. Close any tabs you don’t need to help your Chromebook focus on the recording.
- Check your microphone: If you’re recording with audio, do a quick mic test beforehand. The Chromebook’s built-in mic usually works fine, but an external one or headset can improve sound quality.
- Charge up: Screen recording can drain your battery faster than usual. Be sure your Chromebook is charged or plugged in, especially if you’re recording a long video.
- Check storage space: Make sure you have enough space in your Downloads folder. If you’re running low on space, learn how to free up storage on your Chromebook.
 Dealing with a damaged Chromebook? Looking for replacement parts like screens, batteries, or keyboards to fix your device yourself, or need a professional repair service to do it for you? Whether you’re an individual or a K-12 school representative, The Repair Depot offers high-quality replacement parts and reliable repair solutions for all kinds of damage, from cracked screens to broken keyboards to battery issues. Get your Chromebook repair quote to start your repair process or your Chromebook parts quote to start your order!




 Dealing with a damaged Chromebook? Looking for replacement parts like screens, batteries, or keyboards to fix your device yourself, or need a professional repair service to do it for you? Whether you’re an individual or a K-12 school representative, The Repair Depot offers high-quality replacement parts and reliable repair solutions for all kinds of damage, from cracked screens to broken keyboards to battery issues. Get your